Contents
This chapter describes only how to build and test the Linux kernel; The root file system (aka "userspace") is much harder to build than the Linux kernel and therefore that is described in its own separate chapters.
You'll actually need the Linux kernel. There are a few possible options; You can get the linux-2.6-xlnx branch from git.xilinx.com. Or you can get the main kernel tree. Or you might be able to use the linux-denx branch (but I haven't tried this yet).
Option #1: Use Xilinx's branch. This branch contains more up-to-date patches and has better support for Xilinx peripherals, such as networking):
git clone git://git.xilinx.com/linux-2.6-xlnx.git
cd linux-2.6-xlnx
Option #2: Use the official, mainline kernel. Version 2.6.28 does not support the Xilinx network cores (EMACLITE, LLTEMAC), so it is better to use linux-2.6-xlnx if you want those features:
wget http://www.kernel.org/pub/linux/kernel/v2.6/linux-2.6.28.tar.bz2
tar xjvf linux-2.6.28.tar.bz2
cd linux-2.6.28
Option #3: Use linux-denx. I think the benefit of using this option is that it has more Xenomai hard-realtime support (but I don't yet know if the Xilinx interrupt controller support has been ported to Xenomai):
git clone git://git.denx.de/linux-2.6-denx.git
If you want EMACLITE support, you might need to do a simple, painless patch. EDK 10.1 SP3 provides xps-ethernetlite-2.00.b, but the Linux tree might only support up to 2.00.a. Here's how to fix that (you can use emacs, vim, nano, or whatever editor you are comfortable with):
nano drivers/net/xilinx_emaclite/adapter.c # <-- older versions of kernel
nano drivers/net/xilinx_emaclite.c # <-- newer versions of kernel
Then, find these lines (near line 1000) and add a new line for 2.00.b:
static struct of_device_id xemaclite_of_match[] __devinitdata = {
  { .compatible = "xlnx,opb-ethernetlite-1.01.a", },
  { .compatible = "xlnx,opb-ethernetlite-1.01.b", },
  { .compatible = "xlnx,xps-ethernetlite-1.00.a", },
  { .compatible = "xlnx,xps-ethernetlite-2.00.a", },
  { .compatible = "xlnx,xps-ethernetlite-2.00.b", }, // <-- you add this
  { .compatible = "xlnx,xps-ethernetlite-2.01.a", },
  { /* end of list */ },
};
Edit "arch/powerpc/boot/wrapper" to move the link_address to a higher location, as shown in this patch (see Help with Patch Files if you need help understanding this):
index 965c237..7679f76 100755
--- a/arch/powerpc/boot/wrapper
+++ b/arch/powerpc/boot/wrapper
@@ -138,7 +138,7 @@ objflags=-S
 tmp=$tmpdir/zImage.$$.o
 ksection=.kernel:vmlinux.strip
 isection=.kernel:initrd
-link_address='0x400000'
+link_address='0x800000'
This will mitigate the chance of encountering this error message:
zImage starting: loaded at 0x00400000 (sp: 0x0061deb0)
Allocating 0x48505c bytes for kernel ...
Insufficient memory for kernel at address 0! (_start=00400000, uncompressed size=00405128)
Setup your environment for cross-compiling Linux. For example, if you are using crosstool-ng, you might need to do something like this:
export ARCH=powerpc
export CROSS_COMPILE=powerpc-405-linux-gnu-
export PATH=/home/xilinx/crosstool-ng-1.3.2/powerpc-405-linux-gnu/bin:$PATH
You can test that this worked by trying to run the compiler:
powerpc-405-linux-gnu-gcc
then you should get the message:
powerpc-405-linux-gnu-gcc: no input files
If you are using ELDK 4.2, then you might need to do something like this:
export ARCH=powerpc
export CROSS_COMPILE=ppc_4xx-
export PATH=/home/xilinx/eldk-4.2/usr/bin:$PATH
ppc_4xx-gcc
# Expect to see: ppc_4xx-gcc: no input files
Configure Linux (see the section Configuring Linux for more information):
make menuconfig
The result of configuration is a file called ".config". I highly recommend that you copy this file into a safe location so that you can simply reuse it in the future. To use an old config file, instead of doing a completely fresh menuconfig, run the following commands:
cp my-old-config-file .config
make oldconfig
Copy your device tree (the one that you generated from EDK: xilinx.dts):
cp xilinx.dts arch/powerpc/boot/dts/virtex405-mine.dts
WARNING: It is important that you use the "virtex405-" (or "virtex440-") prefix because the Linux build process does pattern matching on this name. If it finds "virtex405-" as part of the name, then the build process does a few extra magic tricks to make things come out right for Xilinx parts (specifically, I think it enables the Xilinx PPC cache errata).
Build Linux ("-j 4" is to take advantage of your quad-core computer, if you are using one):
nice make -j 4 simpleImage.virtex405-mine
The result of this process is an ELF executable file which can be loaded to the FPGA using XMD or via CompactFlash+SystemACE:
arch/powerpc/boot/simpleImage.virtex405-mine.elf
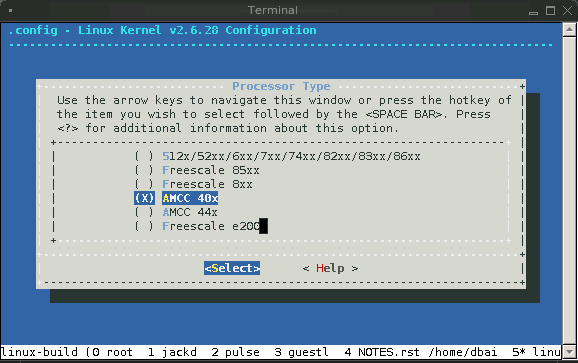
Here are a couple screen shots of what the menuconfig system looks like:
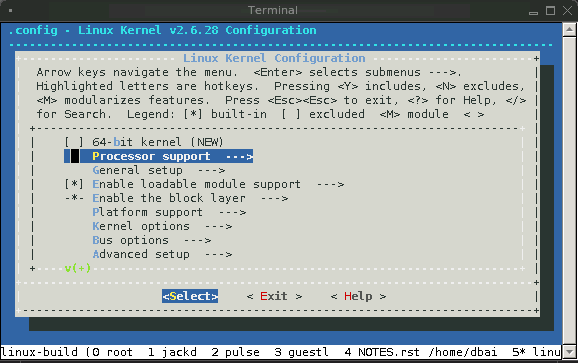
Here are specific settings which you need to configure:
Processor support
Processor support  --->
    Processor Type (AMCC 40x)
Platform support:
Platform support  --->
    [ ] Walnut
    [*] Generic Xilinx Virtex board
Kernel options:
Kernel options  --->
    Timer frequency (250 HZ)
Bus options:
Bus options  --->
    [ ] PCI support
    < > PCCard (PCMCIA/CardBus) support
Networking support:
Device Drivers:
Block devices:
Network device support:
WARNING: The following options are not available in the mainline 2.6.28 tree. You must use linux-2.6-xlnx if you want these features.
Character devices:
GPIO Support:
Device drivers  --->
    [*] Block devices  --->
      < >   Xilinx SystemACE support
    [*] Network device support  --->

      [*]   Ethernet (10 or 100Mbit)  --->
         < >   Xilinx 10/100 OPB EMAC support
         <*>   Xilinx 10/100 OPB EMACLITE support

      [*]   Ethernet (1000 Mbit)  --->
         < >   Xilinx TEMAC 10/100/1000 Ethernet MAC driver
         <*>   Xilinx LLTEMAC 10/100/1000 Ethernet MAC driver
               Xilinx LLTEMAC PHY Support (MARVELL 88E1111 using MII...)

    Character devices  --->
      Serial drivers  --->
        <*> Xilinx uartlite serial port support
        [*]   Support for console on Xilinx uartlite serial port
      <*> Xilinx HWICAP Support

    [*] GPIO Support  --->
      [*]   Xilinx GPIO support
Filesystems:
Second extended fs support: Yes
Network File Systems:
File systems  --->
  <*> Second extended fs support
  [*]   Ext2 execute in place support
  [*] Network File Systems  --->
    <*>   NFS client support
    [*]     Root file system on NFS
From within your EDK project directory (Note: if you are mssing etc/xmd_ppc405_0.opt, it is because you need to choose the menu option: "Debug: XMD Debug Options" then click "OK"):
impact -batch etc/download.cmd
rlwrap -c xmd -opt etc/xmd_ppc405_0.opt
Then, from the XMD prompt, change to the location where you built Linux and download the ELF executable:
XMD% cd /home/dbaird/tmp/xilinx/linux-build/linux-2.6-xlnx
XMD% cd arch/powerpc/boot
XMD% dow simpleImage.virtex405-mine.elf
XMD% run
Observe your serial terminal. When you start running Linux, you should see:
zImage starting: loaded at 0x00400000 (sp: 0x005d1fb0)
Allocating 0x439064 bytes for kernel ...
gunzipping (0x00000000 <- 0x0040d000:0x005d0e9f)...done 0x3b9134 bytes

Linux/PowerPC load: console=ttyUL0 root=/dev/ram
Finalizing device tree... flat tree at 0x5de300
[    0.000000] Using Xilinx Virtex machine description
[    0.000000] Initializing cgroup subsys cpu
[    0.000000] Linux version 2.6.28 (dbaird@takoyaki) (gcc version 4.3.2 (crosstool-NG-1.3.2) ) #2 Sun Mar 8 00:51:10 MST 2009
[    0.000000] Zone PFN ranges:
[    0.000000]   DMA      0x00000000 -> 0x00010000
[    0.000000]   Normal   0x00010000 -> 0x00010000
[    0.000000]   HighMem  0x00010000 -> 0x00010000
[    0.000000] Movable zone start PFN for each node
[    0.000000] early_node_map[1] active PFN ranges
[    0.000000]     0: 0x00000000 -> 0x00010000
[    0.000000] MMU: Allocated 1088 bytes of context maps for 255 contexts
[    0.000000] Built 1 zonelists in Zone order, mobility grouping on.  Total pages: 65024
[    0.000000] Kernel command line: console=ttyUL0 root=/dev/ram
[    0.000000] Xilinx intc at 0x81800000 mapped to 0xff7ff000
[    0.000000] PID hash table entries: 1024 (order: 10, 4096 bytes)
[    0.000000] clocksource: timebase mult[1400000] shift[22] registered
[1266810336.351522] Console: colour dummy device 80x25
[1266810336.351800] console [ttyUL0] enabled
[1266810336.449030] Dentry cache hash table entries: 32768 (order: 5, 131072 bytes)
[1266810336.459534] Inode-cache hash table entries: 16384 (order: 4, 65536 bytes)
[1266810336.512209] allocated 1310720 bytes of page_cgroup
[1266810336.516239] please try cgroup_disable=memory option if you don't want
[1266810336.607852] Memory: 253952k/262144k available (3620k kernel code, 7896k reserved, 164k data, 508k bss, 148k init)
[1266810336.617693] SLUB: Genslabs=10, HWalign=32, Order=0-3, MinObjects=0, CPUs=1, Nodes=1
[1266810336.625446] Calibrating delay loop... 399.36 BogoMIPS (lpj=798720)
[1266810336.719650] Security Framework initialized
[1266810336.724078] SELinux:  Disabled at boot.
[1266810336.728344] Mount-cache hash table entries: 512
[1266810336.735202] Initializing cgroup subsys ns
[1266810336.738537] Initializing cgroup subsys cpuacct
[1266810336.743305] Initializing cgroup subsys memory
[1266810336.759532] net_namespace: 1012 bytes
[1266810336.765172] NET: Registered protocol family 16
[1266810336.847966] XGpio: /plb@0/gpio@81420000: registered
[1266810336.854149] XGpio: /plb@0/gpio@81400000: registered
[1266810336.859945] XGpio: /plb@0/gpio@81440000: registered
[1266810336.897048] NET: Registered protocol family 8
[1266810336.900569] NET: Registered protocol family 20
[1266810336.906890] NetLabel: Initializing
[1266810336.909468] NetLabel:  domain hash size = 128
[1266810336.914395] NetLabel:  protocols = UNLABELED CIPSOv4
[1266810336.919920] NetLabel:  unlabeled traffic allowed by default
[1266810336.942199] NET: Registered protocol family 2
[1266810336.994781] IP route cache hash table entries: 2048 (order: 1, 8192 bytes)
[1266810337.004945] TCP established hash table entries: 8192 (order: 4, 65536 bytes)
[1266810337.012777] TCP bind hash table entries: 8192 (order: 3, 32768 bytes)
[1266810337.019349] TCP: Hash tables configured (established 8192 bind 8192)
[1266810337.025250] TCP reno registered
[1266810337.038796] NET: Registered protocol family 1
[1266810337.068651] audit: initializing netlink socket (disabled)
[1266810337.073857] type=2000 audit(0.571:1): initialized
[1266810337.203759] VFS: Disk quotas dquot_6.5.1
[1266810337.207791] Dquot-cache hash table entries: 1024 (order 0, 4096 bytes)
[1266810337.223789] msgmni has been set to 496
[1266810337.234954] alg: No test for stdrng (krng)
[1266810337.238936] io scheduler noop registered
[1266810337.242724] io scheduler anticipatory registered
[1266810337.247790] io scheduler deadline registered
[1266810337.252848] io scheduler cfq registered (default)
[1266810339.159041] Serial: 8250/16550 driver4 ports, IRQ sharing enabled
[1266810339.184097] 84000000.serial: ttyUL0 at MMIO 0x84000003 (irq = 16) is a uartlite
[1266810339.255647] brd: module loaded
[1266810339.259076] xsysace 83600000.sysace: Xilinx SystemACE revision 1.0.12
[1266810339.266061] xsysace 83600000.sysace: capacity: 990864 sectors
[1266810339.272074]  xsa: xsa1
[1266810339.287488] Xilinx SystemACE device driver, major=254
[1266810339.293598] xilinx_emaclite 81000000.ethernet: Device Tree Probing 'ethernet'
[1266810339.300579] xilinx_emaclite 81000000.ethernet: MAC address is now  2: 0: 0: 0: 0: 0
[1266810339.308123] xilinx_emaclite 81000000.ethernet: using fifo mode.
[1266810339.314456] eth0 (): not using net_device_ops yet
[1266810339.324454] xilinx_emaclite 81000000.ethernet: Xilinx EMACLite at 0x81000000 mapped to 0xD1060000, irq=18
[1266810339.340360] input: Macintosh mouse button emulation as /devices/virtual/input/input0
[1266810339.375342] mice: PS/2 mouse device common for all mice
[1266810339.393678] TCP cubic registered
[1266810339.400431] RPC: Registered udp transport module.
[1266810339.404626] RPC: Registered tcp transport module.
[1266810339.418944] registered taskstats version 1
[1266810339.422775] drivers/rtc/hctosys.c: unable to open rtc device (rtc0)
[1266810339.432673] List of all partitions:
[1266810339.435605] fe00          495432 xsa (driver?)
[1266810339.440209]   fe01          494896 xsa1
[1266810339.444414] No filesystem could mount root, tried:  cramfs
[1266810339.450311] Kernel panic - not syncing: VFS: Unable to mount root fs on unknown-block(1,0)
[1266810339.459072] Rebooting in 180 seconds..
Creating the ACE file. The ACE file is created with the xmd-tool. This tool is available with the xilinx enviroment variables set. There still is a bug in the build scripts for the Xilinx tools which prevents building the ACE file. So according to AR #23192 you first have to edit the file: $XILINX_EDK/data/xmd/genace.tcl. (where XILINX_EDK can be found by issuing "echo $XILINX_EDK"). Line 452 has to look like this (NOTE: rather than actually edit the original file, you probably should make a copy of it and tell XMD to use your copy):
if { [catch {set saddr [exec powerpc-405-linux-gnu-objdump -x $elffile | grep -w "start address"]} err] } {
If you are not patching the file you will get the error that the size of the ELF file is not known. Now you have to create a option file for the xmd debugger. You can place this file anywhere you want, but i have put it into the "etc" directory of the xps project: etc/genace.opt:
-jprog
-board user
-target ppc_hw
-hw ./implementation/download.bit
-elf ../linux-2.6-xlnx/arch/powerpc/boot/simpleImage.virtex405-mine.elf
-configdevice devicenr 1 idcode 0x1127e093 irlength 14 partname xc2vp30
-debugdevice devicenr 1 cpunr 1
-ace system.ace
With this stuff all set you can now run the xmd command within your xps project directory:
xmd -tcl genace.tcl -opt etc/genace.opt
You should now find a file named "system.ace" in your xps project directory. The next paragraph describes how this file i loaded into the fpga via the CF card.
The XUP Board features a CF-card connector. This connector has an ACE controller which is able to program the Virtex 2 Pro by itself and is also able to initialize the volatile memory on the board. To use this functionality the first primary partition on the cf disk should be a FAT16 partition with a maximum size of 2GB.
When creating partitions you should be extremely careful to work on the right disk. You can make sure that you are working on the right disk by issuing a:
dmesg | tail
right after you have plugged your CF-disk into your CF-disk reader. You should see a message like this:
sd 2:0:0:1: [sde] 15858864 512-byte hardware sectors (8120 MB)
Which means that "/dev/sde" is the right device to create a partion on. Then you should create a partition which is large enough to hold the kernel and the bitfile for the virtex2vp30. 16MB seems to be big enough, if you want to have enough space for a big kernel you probably should choose 20MB. Cou can now use:
cfdisk /dev/insert_your_disk_device_here
Typically new CF-disks come with one large partition. You should delete this partition by pressing "d". Now you can create a new partition by pressing "n". Choose a primary partition and enter "20" as size. After that you should press "t" to change the partition type to "06". Finally you should write your partition to the CF-disk by pressing "W". You can create root or other partitions on this disk later on, but right now the result is to be tested.
After the cf-card has been partitioned you have make a new file system on the disk. First some zeros are written to the partition and format it with:
# I'm not sure why/if this dd is necessary:
dd bs=1024 count=1 if=/dev/zero of=/dev/insert_your_disk_device_here
# I think this is the way you are *supposed* to format the card
# (with 1 reserved sector, a requirement of SystemACE):
mkfs.msdos –s 64 –F 16 –R 1 /dev/insert_your_disk_device_here
# ...but I have gotten a report that this works as well (to my
# surprise):
mkfs.msdos -F16 /dev/insert_your_disk_device_here
After this you can now copy your ace file to the newly created partition:
mount /dev/insert_your_disk_device_here /mnt
cp system.ace /mnt
umount /mnt
Remove the card after the "umount" command is finished since write access is buffered, otherwise you might loose data. Now your card is ready to be plugged into the XUP board. Power down the board, plug in the cf-card and then power up your board. The red blinking should stop and there should be a green led blinking. When the green led is lit, you should see the linux boot messages on your serial console.
Here are some trips to make building Linux less tedious: